Hot Cocoa Mug Sugar Cookies Recipe
Introduction
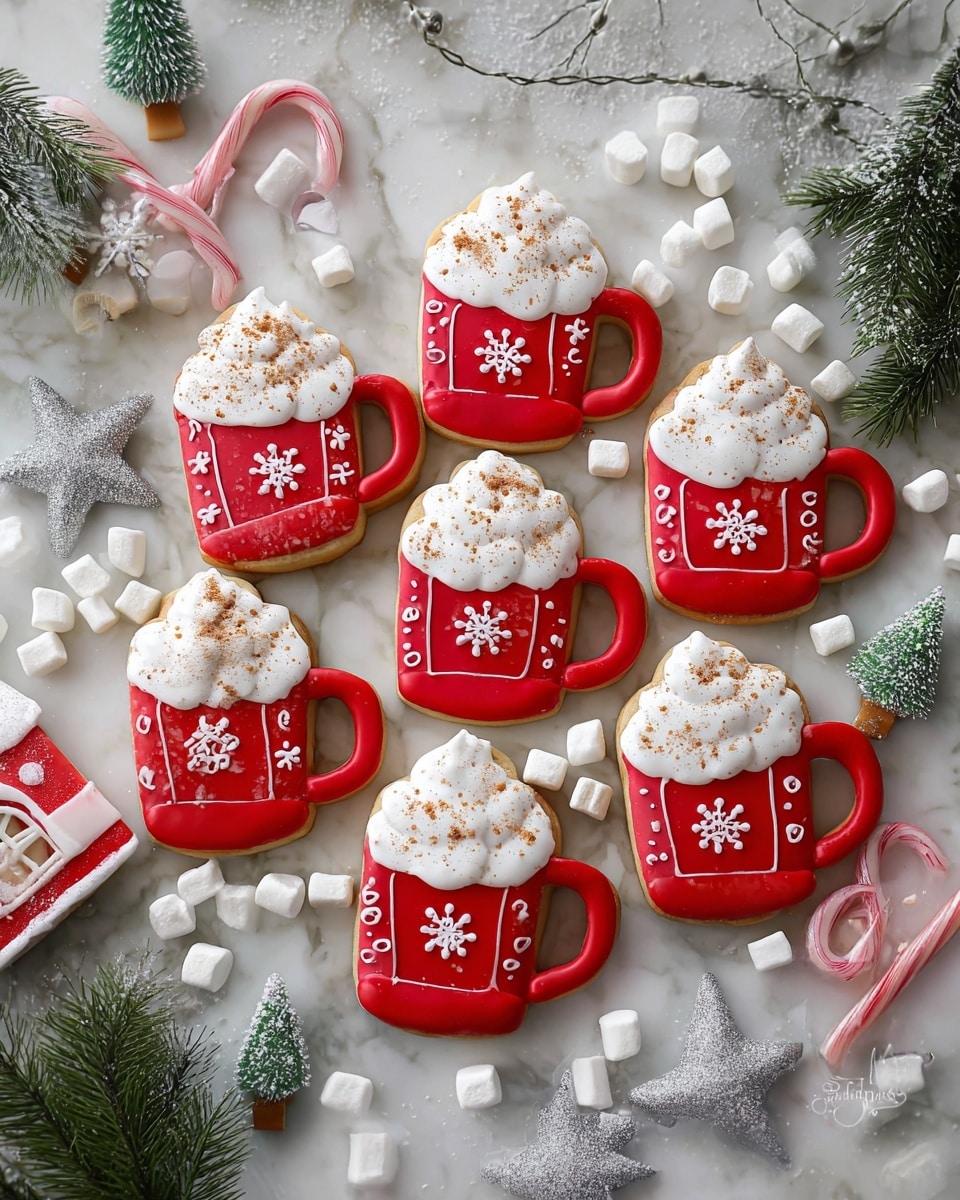
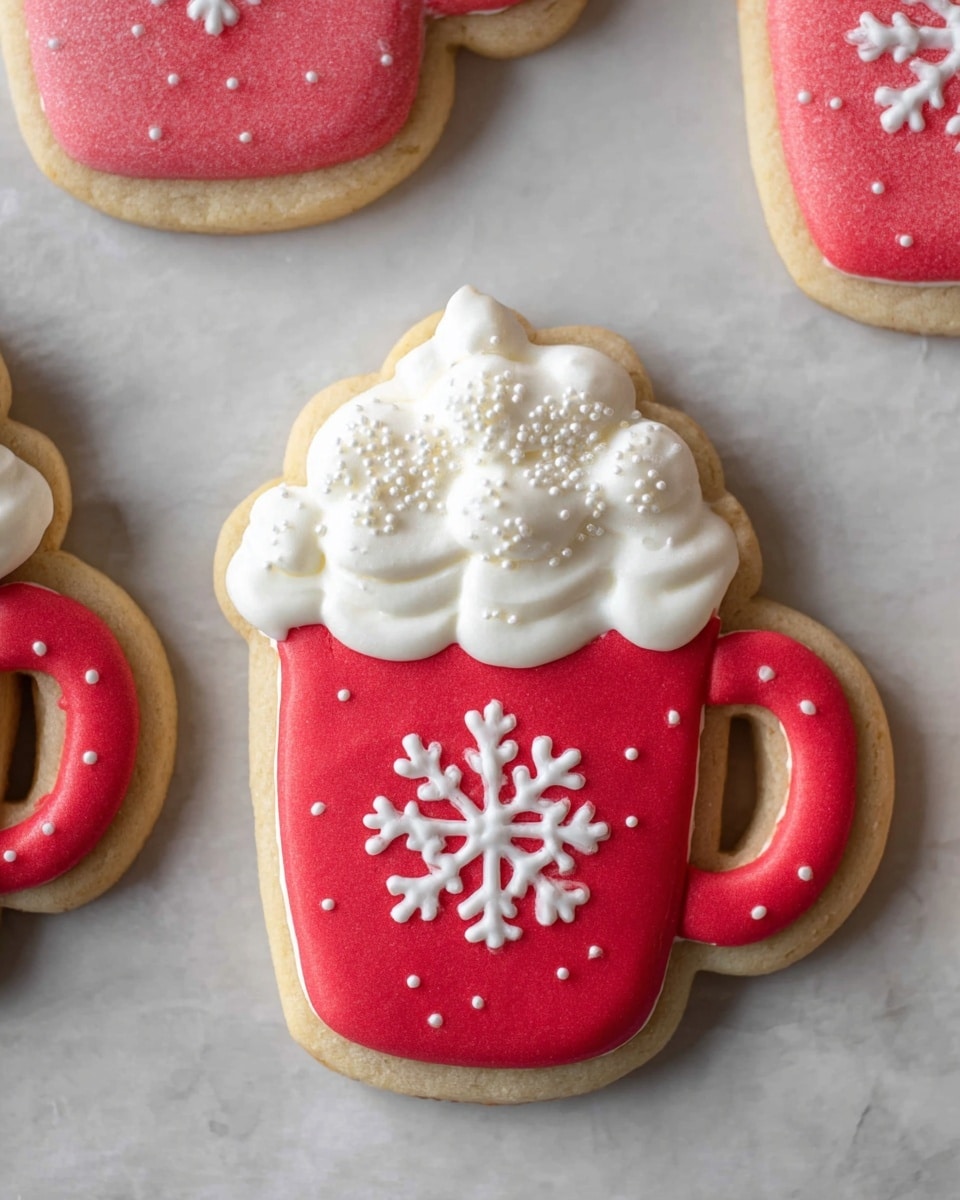
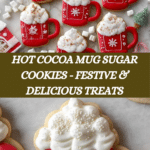
These Hot Cocoa Mug Sugar Cookies are a festive treat perfect for winter gatherings or cozy nights in. Soft, flavorful sugar cookies are decorated to look like steaming mugs of cocoa, adding a playful touch to your holiday baking.
Ingredients
- 1 ¾ cups all-purpose flour
- 1 teaspoon baking soda
- ⅛ teaspoon salt
- ½ cup unsalted butter, room temperature
- 1 cup granulated white sugar
- 1 large egg
- ¾ teaspoon lemon zest
- 2 teaspoons vanilla extract
- 2 tablespoons caramel for decorating cookies (optional)
- For the Meringue Powder Icing:
- 2 ¼ cups confectioners’ icing sugar
- 2 tablespoons Wilton meringue powder
- ¼ cup to ½ cup lukewarm water
- Red food coloring gel (such as Wilton Christmas Red)
Instructions
- Step 1: In a large bowl, whisk together the flour, baking soda, and salt. Set aside.
- Step 2: In a separate bowl, beat the butter and sugar with a hand mixer until light and fluffy.
- Step 3: Add the egg, lemon zest, and vanilla extract to the butter mixture, beating until just combined.
- Step 4: Fold the flour mixture into the wet ingredients and beat until smooth dough forms.
- Step 5: Divide the dough in half, wrap each piece in plastic wrap, and freeze for 10 minutes until firm.
- Step 6: Preheat the oven to 350°F (175°C) and line two baking sheets with parchment paper.
- Step 7: On a lightly floured surface, roll out the dough to ¼-inch thickness. Cut out cookies using a coffee mug cookie cutter and transfer to the baking sheets.
- Step 8: Bake for 10 minutes or until edges begin to brown. Let cookies cool on the sheet for 5 minutes before transferring to a wire rack to cool completely.
- Step 9: To make the royal icing, beat confectioners’ sugar and meringue powder in a large bowl until combined.
- Step 10: Gradually add lukewarm water and beat until stiff peaks form, about 5 minutes. Adjust sugar or water to get icing that forms ribbons that hold for 2-3 seconds.
- Step 11: Tint about ¾ of the icing red using food coloring gel (approximately ⅛ teaspoon). Use the rest white.
- Step 12: Transfer icings into separate piping bags fitted with Wilton tip #8 for the mug and #32 for the cream part of the cookie.
- Step 13: Outline and fill the mug part of the cookie with red icing, then fill the cream part with white icing.
- Step 14: Use white icing to draw a snowflake in the center of each cookie. Optionally, draw a thin caramel line between the mug and cream parts.
- Step 15: Gently shake decorated cookies to settle any bumps and let the icing dry completely before storing.
Tips & Variations
- Use a toothpick to smooth out holes or rough spots in the icing while decorating.
- If you don’t have a coffee mug cookie cutter, a large circle or oval cutter can work as a substitute.
- For extra flavor, try adding a pinch of cinnamon or cocoa powder to the cookie dough.
- Store decorated cookies in an airtight container and keep them in a cool place to preserve the icing.
Storage
Store the fully cooled and decorated cookies in an airtight container at room temperature for 4 to 5 days. Avoid humidity to keep the icing from softening. If needed, reheat slightly in the microwave for a few seconds to enjoy a softer cookie, but do so before icing hardens completely.
How to Serve
Serve this delicious recipe with your favorite sides.
FAQs
Can I make the cookie dough ahead of time?
Yes, the dough can be prepared and refrigerated for up to 24 hours before rolling and cutting. Just bring it back to a slightly firm but pliable state by chilling briefly before rolling out.
What if I don’t have meringue powder for the icing?
Meringue powder helps the icing harden properly, but you can substitute with egg whites if preferred. Use pasteurized egg whites to ensure safety and beat them with icing sugar just as you would with meringue powder.
PrintHot Cocoa Mug Sugar Cookies Recipe

These Hot Cocoa Mug Sugar Cookies are festive, buttery sugar cookies shaped like coffee mugs and decorated with vibrant royal icing to resemble hot cocoa topped with whipped cream. Perfect for holiday celebrations or cozy gatherings, they combine a classic sugar cookie base with detailed meringue powder icing decorations including snowflakes and optional caramel accents for an extra touch of sweetness.
- Prep Time: 20 minutes
- Cook Time: 10 minutes
- Total Time: 30 minutes
- Yield: Approximately 18–24 cookies depending on cutter size 1x
- Category: Dessert
- Method: Baking
- Cuisine: American
- Diet: Vegetarian
Ingredients
For The Cookies:
- 1 ¾ cups all-purpose flour
- 1 teaspoon baking soda
- ⅛ teaspoon salt
- ½ cup unsalted butter, room temperature
- 1 cup granulated white sugar
- 1 large egg
- ¾ teaspoon lemon zest
- 2 teaspoons vanilla extract
- 2 tablespoons caramel for decorating cookies (optional)
For The Meringue Powder Icing:
- 2 ¼ cups confectioners’ icing sugar
- 2 tablespoons Wilton meringue powder
- ¼ cup to ½ cup lukewarm water
- Red food coloring gel (such as Wilton Christmas Red)
Instructions
- Prepare Dry Ingredients: In a large bowl, whisk together the all-purpose flour, baking soda, and salt until evenly combined. Set aside.
- Cream Butter and Sugar: In a separate bowl, use a hand mixer to beat the room temperature unsalted butter and granulated sugar until the mixture is light and fluffy.
- Add Wet Ingredients: Add the large egg, lemon zest, and vanilla extract to the butter and sugar mixture and beat until just combined, ensuring not to overmix.
- Combine Dough: Gradually fold the flour mixture into the wet ingredients, beating gently until a smooth cookie dough forms.
- Chill Dough: Divide the dough into two equal parts, wrap each piece tightly in plastic wrap, then freeze for 10 minutes or until the dough is firm enough to roll out.
- Preheat Oven and Prepare Pans: Preheat the oven to 350°F (175°C). Line two baking sheets with parchment paper to prevent sticking and promote even baking.
- Roll and Cut Cookies: On a lightly floured surface, roll out each portion of dough to ¼-inch thickness. Using a coffee mug cookie cutter, cut out shapes and carefully transfer them to the prepared baking sheets.
- Bake Cookies: Bake in the preheated oven for about 10 minutes or until the edges start to turn light golden brown, indicating doneness.
- Cool Cookies: Remove cookies from the oven and let cool on the baking sheets for 5 minutes, then transfer them to a wire rack to cool completely before decorating.
- Make Royal Icing: In a large bowl, beat together the confectioners’ sugar and meringue powder until combined. Gradually add the lukewarm water while beating to reach stiff peaks, usually about 5 minutes. Adjust consistency by adding more sugar or water as needed.
- Color Icing: Tint about three-quarters of the icing with red food coloring gel (approx. 1/8 teaspoon). Keep the remaining portion white for decoration details.
- Decorate Cookies: Transfer the red royal icing into an icing bag fitted with Wilton tip #8. Use tip #8 to outline and fill the mug portion of each cookie. Use another icing bag fitted with tip #32 for filling the “cream” part with white royal icing.
- Add Details: Use white royal icing with tip #32 or similar to pipe snowflakes on the center of each cookie on the mug.
- Add Optional Caramel Decoration: Draw a thin horizontal line of caramel between the mug and cream parts for extra flavor and decoration if desired.
- Set Icing: Gently shake each decorated cookie to settle any icing bumps and let the royal icing dry completely before storing or serving.
Notes
- Link for Cookie Cutter: https://amzn.to/3w9mJ1m
- Store cookies in an airtight container for 4-5 days to maintain freshness and texture.
- Use a toothpick to fix any holes or rough spots while decorating to ensure a smooth finish on your royal icing.
- Start decorating your least favorite cookies first in case of any mistakes, allowing practice before the best cookies.
Keywords: hot cocoa mug cookies, sugar cookies, royal icing cookies, holiday cookies, Christmas cookies, decorated sugar cookies, meringue powder icing, festive cookies