Pumpkin Magic Custard Cake Recipe
Introduction
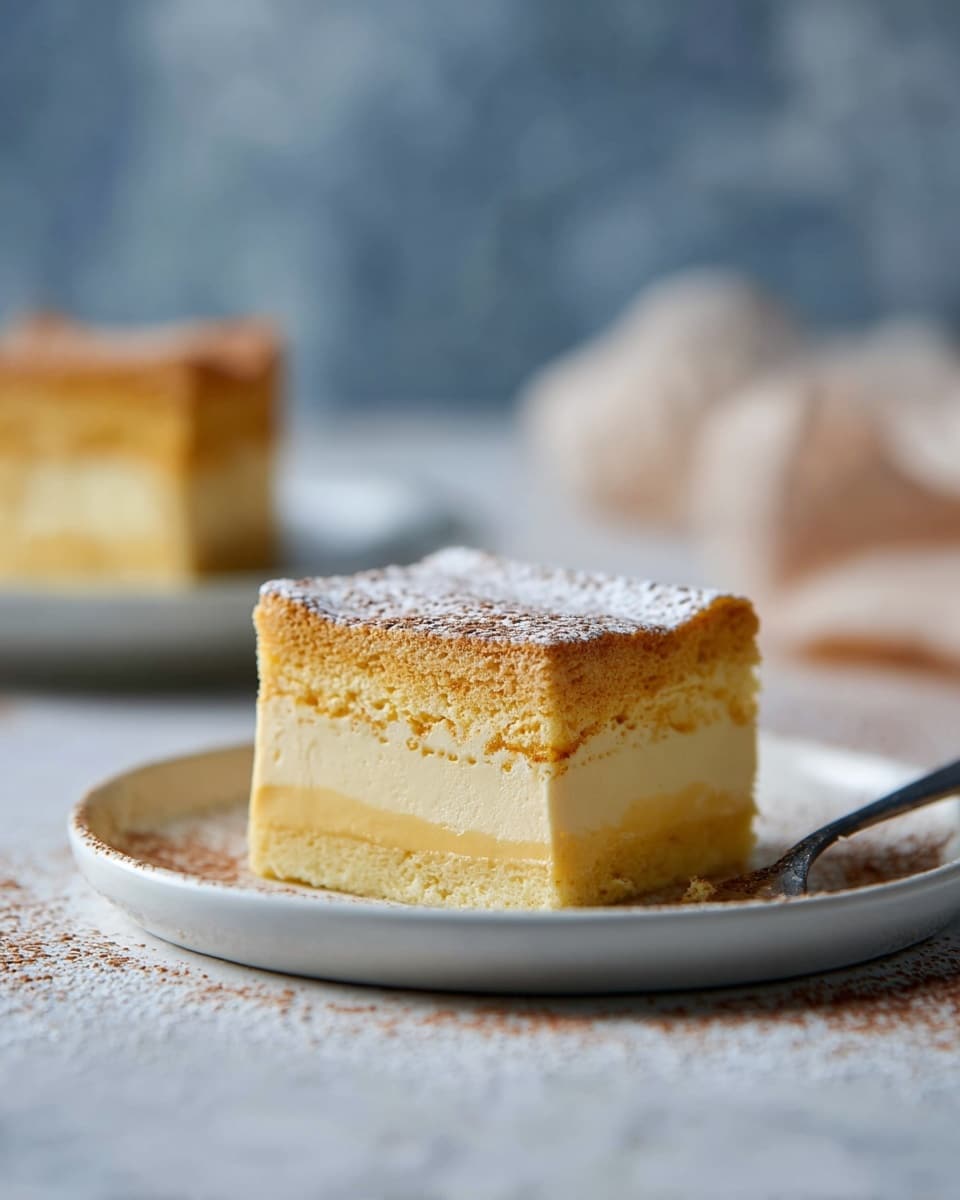
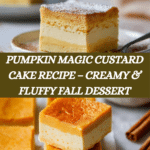
Pumpkin Magic Custard Cake is a delightful autumn dessert with three distinct layers—a soft cake base, a creamy pumpkin custard middle, and a light, fluffy sponge top. This easy-to-make treat combines warm spices and pumpkin for a cozy flavor perfect for fall gatherings.
Ingredients
- 1/2 cup butter
- 2 cups whole milk
- 4 large eggs (yolks separated from whites)
- Pinch of cream of tartar
- 1 1/2 cups confectioners’ sugar
- 1 teaspoon vanilla extract
- 1 teaspoon ground cinnamon
- 1 teaspoon pumpkin pie spice
- 1 cup pumpkin puree (not pumpkin pie filling)
- 1 cup all-purpose flour
Instructions
- Step 1: Preheat your oven to 325°F (165°C). Line an 8×8-inch or 9×9-inch square baking pan with parchment paper for easy removal.
- Step 2: Warm the milk until just lukewarm, then set it aside to use later.
- Step 3: In a clean bowl, whip the egg whites with a pinch of cream of tartar until stiff peaks form. Set aside carefully.
- Step 4: Melt the butter and allow it to cool slightly so it doesn’t cook the eggs.
- Step 5: Beat the egg yolks with confectioners’ sugar until pale and frothy. Add vanilla extract, ground cinnamon, pumpkin pie spice, and the melted butter. Mix well.
- Step 6: Stir in the flour until the batter is smooth. Then whisk in the pumpkin puree and about 1/4 cup of the lukewarm milk.
- Step 7: Slowly add the remaining milk while mixing on low speed. The batter will be thin and runny, which is key for forming the custard layer.
- Step 8: Gently fold the whipped egg whites into the batter using a spatula. It’s okay if a few small lumps remain to keep the mixture airy.
- Step 9: Pour the batter into the prepared pan and bake for 60 to 65 minutes. The top should turn golden and the center will jiggle slightly when done.
- Step 10: Allow the cake to cool completely, then refrigerate for a few hours to let the custard set properly.
- Step 11: Slice into squares and serve. Enjoy the unique layers and comforting pumpkin flavor.
Tips & Variations
- Use fresh pumpkin puree or canned 100% pumpkin for best flavor; avoid pumpkin pie filling as it contains added sugars and spices.
- For a nutty twist, sprinkle chopped toasted pecans on top before baking.
- Serve with a dollop of whipped cream or a drizzle of caramel sauce for extra indulgence.
Storage
Store the Pumpkin Magic Custard Cake covered in the refrigerator for up to 3 days. Reheat individual slices gently in the microwave if desired, though it is often best served chilled to enjoy the custard texture.
How to Serve

Serve this delicious recipe with your favorite sides.
FAQs
Can I use a different type of milk?
Whole milk is preferred for the richness it adds, but you can use 2% or even a non-dairy milk like oat milk. Keep in mind the flavor and texture may vary slightly.
Why do I need to separate the eggs?
Separating the eggs allows you to whip the egg whites into stiff peaks, which creates the fluffy sponge layer on top. The yolks contribute to the creamy custard layer and add richness.
PrintPumpkin Magic Custard Cake Recipe
Pumpkin Magic Custard Cake is a delightful fall dessert featuring a luscious custard layer infused with pumpkin and warm spices, topped with a fluffy sponge cake. This bake-to-perfection treat combines a soft cake base, creamy pumpkin custard middle, and a light meringue topping, delivering a comforting and magical taste of autumn.
- Prep Time: 20 minutes
- Cook Time: 65 minutes
- Total Time: 3 hours 25 minutes
- Yield: 9 servings 1x
- Category: Dessert
- Method: Baking
- Cuisine: American
Ingredients
Butter and Dairy
- 1/2 cup butter
- 2 cups whole milk
Eggs and Sugars
- 4 large eggs (yolks separated from whites)
- 1 1/2 cups confectioners’ sugar
Flavorings and Spices
- 1 teaspoon vanilla extract
- 1 teaspoon ground cinnamon
- 1 teaspoon pumpkin pie spice
- Pinch of cream of tartar
Produce and Dry Ingredients
- 1 cup pumpkin puree (not pumpkin pie filling)
- 1 cup all-purpose flour
Instructions
- Preheat and Prepare Pan: Preheat your oven to 325°F (165°C). Line an 8×8-inch or 9×9-inch square baking pan with parchment paper to prevent sticking and ensure easy removal after baking.
- Warm the Milk: Gently warm the milk until it is just lukewarm. Set it aside to use later in the batter.
- Whip Egg Whites: In a clean bowl, whip the egg whites along with a pinch of cream of tartar until stiff peaks form. This light meringue will create the fluffy top layer of the cake. Set aside carefully.
- Melt Butter: Melt the butter and allow it to cool slightly so it doesn’t cook the eggs when added.
- Mix Egg Yolks and Sugar: Beat the egg yolks together with the confectioners’ sugar until the mixture becomes pale and frothy. This adds volume and sweetness to the custard layer.
- Add Spices and Butter: Stir in the vanilla extract, ground cinnamon, pumpkin pie spice, and the melted butter to the egg yolk mixture, mixing well to combine the warm seasonal flavors.
- Add Dry Ingredients and Pumpkin: Incorporate the flour into the mixture and mix until smooth. Then whisk in the pumpkin puree and about 1/4 cup of the lukewarm milk to loosen the batter slightly.
- Combine Remaining Milk: Slowly pour the rest of the milk into the batter on low speed. The batter should be thin and runny; this texture helps create the distinct custard layer during baking.
- Fold in Egg Whites: Gently fold the whipped egg whites into the batter using a spatula, being careful not to deflate them entirely. A few small lumps are acceptable and contribute to the cake’s texture.
- Pour and Bake: Transfer the batter into the prepared pan and bake for 60 to 65 minutes. The cake is ready when the top turns golden and the center jiggles slightly, indicating a creamy custard beneath the sponge.
- Cool and Chill: Allow the cake to cool completely at room temperature. Then refrigerate for a few hours to let the custard set firmly, enhancing the flavors and texture.
- Slice and Serve: Cut the chilled cake into squares and serve. Enjoy the magical combination of the soft base, creamy pumpkin custard middle, and fluffy sponge topping—a perfect comforting fall dessert.
Notes
- Ensure the egg whites are whipped to stiff peaks for a light and airy sponge top.
- Use pumpkin puree, not pumpkin pie filling, to control sweetness and texture.
- Let the cake chill sufficiently to fully set the custard layer before slicing.
- Line your pan with parchment paper for easy removal and cleaner edges.
- Adjust baking time slightly depending on your oven, as you want a golden top but a gently jiggling custard center.
Keywords: pumpkin custard cake, fall dessert, pumpkin dessert, magic custard cake, layered pumpkin cake, fall baking, autumn dessert