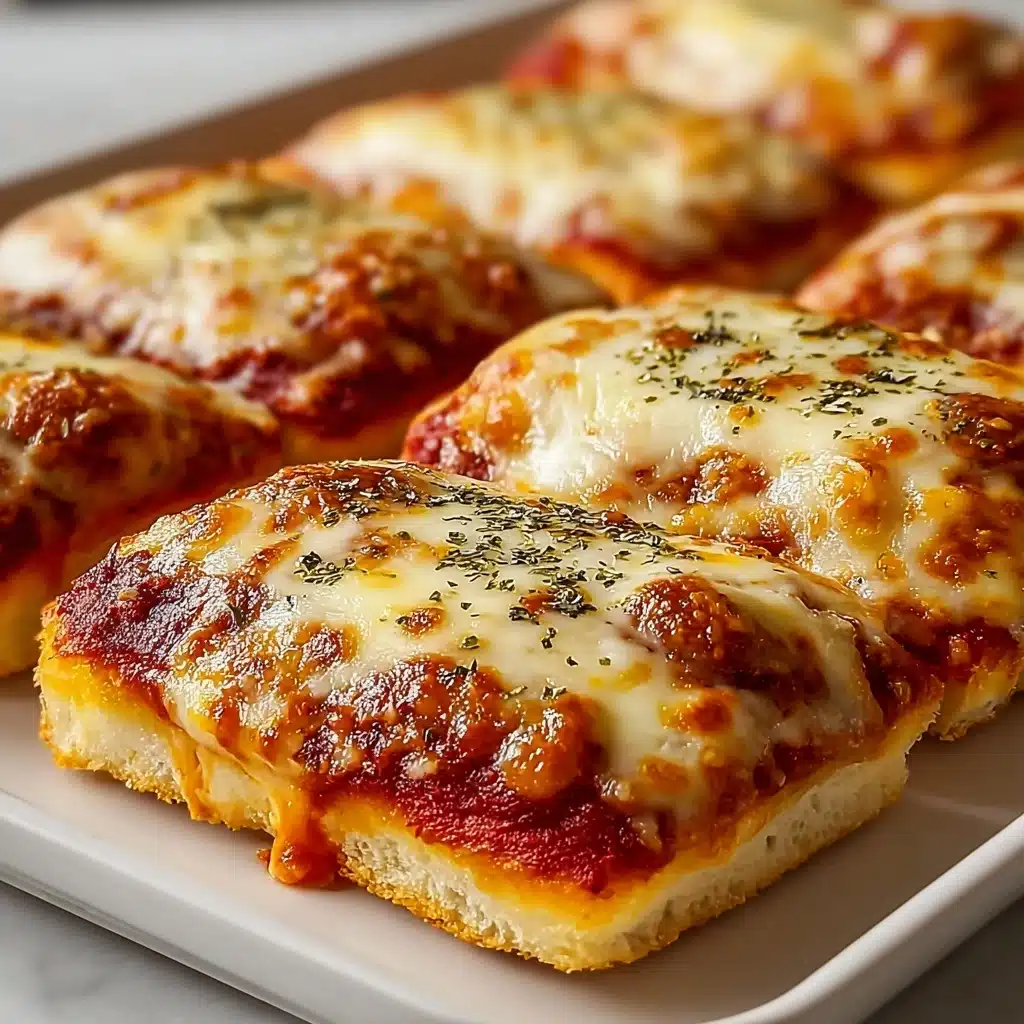
Homemade Easy Cheesy Pizza Pockets Recipe
If you’ve ever craved pizza that you could eat with your hands, minus the mess, these Homemade Easy Cheesy Pizza Pockets are for you! Imagine biting through a golden, crisp crust that gives way to a gooey, cheesy inside with all your favorite pizza fillings. Whether you’re whipping these up for a playful family dinner, an after-school snack, or a cozy movie night, this approachable recipe is about to become a staple in your home. One taste of the melty cheese, zesty sauce, and customizable add-ins, and everyone at the table will be reaching for seconds—trust me!
Ingredients You’ll Need
Just a handful of everyday ingredients come together to create pure pizza magic. Each one serves a purpose, whether it’s adding gooeyness, punchy flavor, or that golden bakery finish everyone loves. Don’t skip a thing—these essentials turn simple ingredients into truly irresistible Homemade Easy Cheesy Pizza Pockets.
- Refrigerated pizza dough: This makes prep super quick, yet still delivers a perfectly chewy, pizza-like crust. Substitute with crescent roll dough for a flakier, buttery finish.
- Marinara or pizza sauce: A punch of tangy tomato flavor forms the perfect base; use your favorite jarred or homemade blend.
- Shredded mozzarella cheese: The key to that classic melt-and-stretch everyone loves about pizza!
- Grated Parmesan cheese: Adds a salty, nutty pop that brings depth to each pocket.
- Mini pepperoni or cooked sausage (optional): Little bites of meaty goodness if you’re craving that pizzeria vibe.
- Chopped bell peppers, mushrooms, or olives (optional): Veggie-packed flair that also adds color and texture.
- Italian seasoning: This blend infuses each bite with classic herby aromas.
- Red pepper flakes (optional): For those who like a tiny kick.
- Egg (for egg wash): Creates that shiny, bakery-worthy golden finish on every pocket.
- Dried oregano or garlic powder (for garnish): A final sprinkle to make the crust sing with flavor.
How to Make Homemade Easy Cheesy Pizza Pockets
Step 1: Prep Your Workspace
Start by heating your oven to 375°F (190°C). Line a baking sheet with parchment paper—this not only prevents sticking but makes cleanup so much easier. Lay out your dough, gather your fillings, and get ready to build the most nostalgic, irresistible pockets ever.
Step 2: Roll Out the Dough
Unroll your chosen pizza (or crescent) dough onto a lightly floured surface. Use a rolling pin to even it out, then cut the dough into 4×4-inch squares (or circles, for a fun twist). Consistent sizing means they’ll all bake up perfectly together!
Step 3: Add That Saucy Goodness
Spoon a bit of marinara or pizza sauce onto each square. Spread it gently, keeping a clean edge around the outside—this helps the pockets seal perfectly, so your glorious fillings don’t escape during baking.
Step 4: Pile On Cheese and Fillings
It’s time to make things ooey-gooey. Add a generous pinch of mozzarella and a sprinkle of Parmesan to each base, then jazz things up with your choice of mini pepperoni, sausage, or those colorful veggies. Finish with Italian seasoning and a tiny sprinkle of red pepper flakes if you want a little fire.
Step 5: Seal and Shape the Pockets
Now, fold each square over into a triangle or rectangle, depending on your cut. Press the edges together firmly, then use a fork to crimp and completely seal the border—this not only keeps everything inside but creates that classic pizza pocket look.
Step 6: Top and Bake
Brush the tops of your sealed pockets with the beaten egg. This creates that coveted shiny, golden crust. Finish with a little dried oregano or garlic powder for fragrance and flavor. Pop the pan in the oven and bake for 12 to 15 minutes, or until the pockets become puffed and deeply golden.
Step 7: Cool and Enjoy!
Let your Homemade Easy Cheesy Pizza Pockets cool just a few minutes (the insides will be hot!). Serve with extra marinara sauce for dunking, or simply let everyone tear them open and revel in the melty cheesiness inside. You did it!
How to Serve Homemade Easy Cheesy Pizza Pockets

Garnishes
Everyone loves a pocket dressed to the nines! A fresh sprinkle of chopped parsley or basil right before serving makes these Homemade Easy Cheesy Pizza Pockets look—and taste—like they came straight from a local Italian bakery. A drizzle of extra-virgin olive oil or a dusting of grated Parmesan just before serving adds even more flavor and a truly tempting finish.
Side Dishes
Pair your pizza pockets with crisp Caesar or mixed green salads for a complete meal that’s still light and fun. Roasted veggies or a bowl of comforting tomato soup take this handheld treat to new heights. Don’t forget some extra warm marinara on the side—dipping is half the fun!
Creative Ways to Present
These Homemade Easy Cheesy Pizza Pockets are party food perfection. Arrange them on a rustic wooden board alongside little dipping bowls of sauce—think ranch, garlic butter, or even pesto. Or slip them into lunchboxes for a surprise treat. You can also make mini versions for appetizers or slice big pockets into halves or quarters for sharing.
Make Ahead and Storage
Storing Leftovers
If your family somehow leaves any behind, store leftover Homemade Easy Cheesy Pizza Pockets in an airtight container in the fridge for up to three days. The crust stays sturdy and the cheesy filling reheats nicely, making leftovers a total win.
Freezing
Want to prep ahead? Assemble and bake the pizza pockets as directed, let them cool fully, then freeze in a single layer on a baking sheet. Once solid, pop them into a freezer bag—now you have a stash ready for any busy weeknight. They’ll keep for up to 2 months.
Reheating
For best results, reheat in a 350°F (175°C) oven for 8–10 minutes straight from the fridge (or a little longer from frozen). This keeps the crust crisp and the insides nice and gooey. Microwave works in a pinch but you’ll lose that magical crunch.
FAQs
Can I use homemade dough for these Homemade Easy Cheesy Pizza Pockets?
Absolutely! If you love making your own dough, go for it. Just roll it out to a 1/4-inch thickness as you would with store-bought, and follow all the same steps. Your pockets will be even more artisanal and delicious.
What fillings work best besides cheese and pepperoni?
This recipe is so flexible! Try adding cooked and crumbled sausage, sautéed mushrooms, spinach, or even pineapple for a Hawaiian twist. Just make sure any veggies are pre-cooked and not too wet, so you don’t end up with soggy pockets.
How can I make gluten-free Homemade Easy Cheesy Pizza Pockets?
Use your favorite gluten-free pizza dough, whether homemade or store-bought. The filling is naturally gluten-free, so just swap out the dough and you’re good to go—everyone can enjoy these cheesy treats!
Do I have to use an egg wash?
The egg wash helps your pockets bake up shiny and golden, but it’s not essential. If you skip it, they’ll still taste amazing, just with a less glossy finish. Brush with a little milk or olive oil instead, if you prefer.
Can I prepare these Homemade Easy Cheesy Pizza Pockets in advance for a party?
Yes! You can assemble the pockets earlier in the day, keep them covered in the fridge, and then bake them right before your guests arrive. They’ll come out bubbling, fresh, and impossible to resist.
Final Thoughts
Once you make these Homemade Easy Cheesy Pizza Pockets, you’ll wonder how you ever lived without them! They’re fast, family-friendly, easy to make ahead, and a guaranteed hit with any crowd. So go ahead—get creative, have fun with the fillings, and let yourself fall in love with every bite. Happy baking!
PrintHomemade Easy Cheesy Pizza Pockets Recipe

These Homemade Easy Cheesy Pizza Pockets are a delicious and convenient snack or meal option. Filled with gooey cheese, savory marinara sauce, and your favorite toppings, these pockets are sure to be a hit with the whole family. Perfect for a quick lunch or as a fun appetizer for a party!
- Prep Time: 15 minutes
- Cook Time: 15 minutes
- Total Time: 30 minutes
- Yield: 4 pizza pockets 1x
- Category: Appetizer, Snack
- Method: Baking
- Cuisine: Italian
- Diet: Vegetarian
Ingredients
Dough Options:
- 1 package refrigerated pizza dough (or crescent roll dough for flakier texture)
Filling:
- 1/2 cup marinara or pizza sauce
- 1 1/2 cups shredded mozzarella cheese
- 1/4 cup grated Parmesan cheese
- 1/4 cup mini pepperoni or cooked sausage (optional)
- 1/4 cup chopped bell peppers, mushrooms, or olives (optional)
- 1 tsp Italian seasoning
- Pinch of red pepper flakes (optional)
Topping:
- 1 egg, beaten (for egg wash)
- Dried oregano or garlic powder (for garnish)
Instructions
- Preheat oven: Preheat oven to 375°F (190°C) and line a baking sheet with parchment paper.
- Roll out dough: Roll out dough and cut into 4×4 inch squares or circles, depending on your preference.
- Add sauce and toppings: Spread a small spoonful of marinara sauce on each piece, leaving edges clear. Add mozzarella, Parmesan, and any desired toppings. Sprinkle with Italian seasoning and red pepper flakes.
- Form pockets: Fold the dough over to form a pocket and seal edges with a fork.
- Brush with egg wash: Brush the tops with beaten egg and sprinkle with oregano or garlic powder.
- Bake: Bake for 12–15 minutes or until golden brown and crispy.
- Cool and serve: Cool slightly before serving. Serve with extra marinara for dipping.
Notes
- You can customize these pizza pockets with your favorite pizza toppings.
- Feel free to make your own pizza dough for a more personalized touch.
Nutrition
- Serving Size: 1 pizza pocket
- Calories: 290
- Sugar: 2g
- Sodium: 620mg
- Fat: 15g
- Saturated Fat: 7g
- Unsaturated Fat: 6g
- Trans Fat: 0g
- Carbohydrates: 25g
- Fiber: 1g
- Protein: 13g
- Cholesterol: 55mg
Keywords: Pizza Pockets, Homemade, Cheesy, Easy, Snack, Appetizer


