Ornament Sugar Cookies Recipe
Introduction
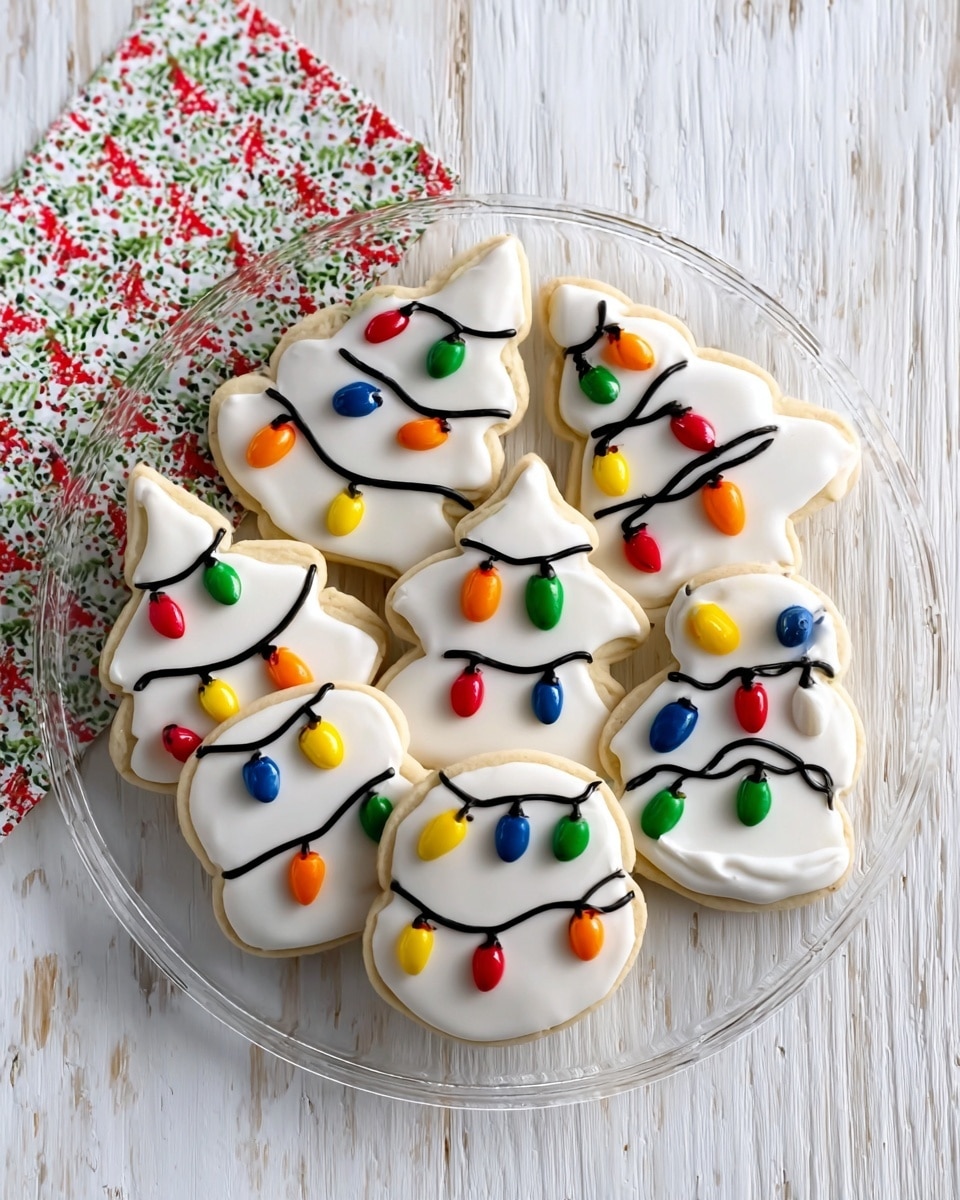
These Ornament Sugar Cookies are perfect for the holiday season, offering a delightful buttery flavor and a festive shape. Their delicate texture and customizable decoration make them a hit for family gatherings or cookie exchanges.

Ingredients
- 4 sticks unsalted butter, room temperature
- 2 cups granulated sugar
- 6 cups all-purpose flour
- 1 teaspoon salt
- 1/2 teaspoon baking powder
- 2 eggs
- 1 teaspoon vanilla extract (or vanilla bean extract or cookie nip)
Instructions
- Step 1: Cream the butter and sugar together with a stand mixer until the mixture is light and fluffy, about 5 minutes.
- Step 2: Add the vanilla extract and eggs to the butter mixture and mix well until fully combined.
- Step 3: In a separate bowl, whisk together the flour, baking powder, and salt. Gradually add this dry mixture to the butter mixture, mixing until a smooth dough forms.
- Step 4: Divide the dough into two equal sections.
- Step 5: On a lightly floured surface, roll out one section of dough at a time to a thickness of about 1/8 inch.
- Step 6: Use cookie cutters to cut out your desired shapes.
- Step 7: Use a straw to cut a hole at the top of each cookie, gently wiggling it to enlarge the opening for hanging.
- Step 8: Freeze the shaped cookies for one hour to help them hold their shape during baking.
- Step 9: Preheat your oven to 375°F (190°C).
- Step 10: Bake the cookies for 8 to 10 minutes, or until the edges turn golden brown.
- Step 11: Immediately after removing from the oven, use the straw to reopen the holes in the cookies if needed.
- Step 12: Let the cookies cool on the baking tray for 10 to 15 minutes before transferring them to a wire rack to cool completely.
- Step 13: Decorate the cooled cookies with frosting, royal icing, or edible color markers to create festive ornament designs.
Tips & Variations
- For neater holes, dip the straw in flour before cutting to prevent sticking.
- Use different extracts like almond or peppermint to change the flavor profile.
- Freeze dough wrapped tightly if baking later, thaw before rolling out.
- Royal icing works best for detailed decorating and hardens nicely for hanging ornaments.
Storage
Store cooled cookies in an airtight container at room temperature for up to one week. If decorated with royal icing, allow the icing to fully dry before stacking or storing. For longer storage, freeze baked cookies in a sealed container for up to 3 months; thaw at room temperature before decorating or serving.
How to Serve
Serve this delicious recipe with your favorite sides.
FAQs
Can I use salted butter instead of unsalted?
Yes, but reduce or omit the added salt in the recipe to avoid overly salty cookies.
How do I keep the holes from closing during baking?
Freezing the cut cookies before baking helps them keep their shape. Also, reopening the holes immediately after baking with a straw ensures they stay open for hanging or decoration.
PrintOrnament Sugar Cookies Recipe
These Ornament Sugar Cookies are classic buttery treats perfect for holiday decorating. Made with simple ingredients like butter, sugar, and vanilla, these rolled sugar cookies are cut into festive shapes with a hollow center, baked to golden perfection, and ready to be decorated with frosting or royal icing. Freezing the dough ensures crisp edges and perfect shapes, making them ideal for festive celebrations and cookie exchanges.
- Prep Time: 20 minutes
- Cook Time: 10 minutes
- Total Time: 1 hour 30 minutes
- Yield: Approximately 48 cookies depending on size and shape 1x
- Category: Dessert
- Method: Baking
- Cuisine: American
Ingredients
Dry Ingredients
- 6 cups all-purpose flour
- 1 teaspoon salt
- 1/2 teaspoon baking powder
Wet Ingredients
- 4 sticks (1 pound) unsalted butter, room temperature
- 2 cups granulated sugar
- 2 large eggs
- 1 teaspoon vanilla extract (or vanilla bean extract or cookie nip)
Instructions
- Cream Butter and Sugar: Using a stand mixer, cream the room temperature unsalted butter and granulated sugar together for about 5 minutes until light and fluffy. This process helps to create a tender and airy cookie texture.
- Add Eggs and Vanilla: Add the vanilla extract and eggs to the butter-sugar mixture, mixing well until fully combined and smooth.
- Combine Dry Ingredients: In a separate bowl, whisk together the all-purpose flour, baking powder, and salt. Gradually add this flour mixture to the wet ingredients, mixing thoroughly to form a smooth dough.
- Divide and Roll Dough: Divide the dough into two sections for easier handling. Roll out one section at a time on a lightly floured surface to about 1/8 inch thickness.
- Cut Shapes and Create Holes: Use cookie cutters to cut out desired festive shapes. Then use a straw to cut out a hole near the top of each cookie to create the ornament effect. Wiggle the straw gently to enlarge the hole as needed.
- Freeze Dough: Place the cut cookies in the freezer for one hour. Chilling the dough helps maintain shape during baking and results in crisp edges.
- Preheat and Bake: Preheat your oven to 375°F (190°C). Bake the cookies for 8 to 10 minutes or until they are golden brown on the edges.
- Reopen Holes: As soon as the cookies come out of the oven, use the straw to reopen and smooth out the holes since baking may cause them to shrink or close.
- Cool Cookies: Let the cookies sit on the baking tray for 10 to 15 minutes to firm up before transferring them to a wire rack to cool completely.
- Decorate: Once cooled, decorate the cookies with frosting, royal icing, or edible color markers to create beautiful ornament designs perfect for gifting or holiday parties.
Notes
- For extra flavor, consider adding a teaspoon of almond extract along with the vanilla.
- Use a strong straw or small piping tip to create clean, even holes for hanging the ornaments.
- Store cookies in an airtight container to maintain freshness for up to one week.
- These cookies can be made ahead and frozen before or after baking.
- Ensure butter is at room temperature for proper creaming.
Keywords: sugar cookies, ornament cookies, holiday cookies, decorated cookies, festive baking, Christmas cookies, butter cookies
