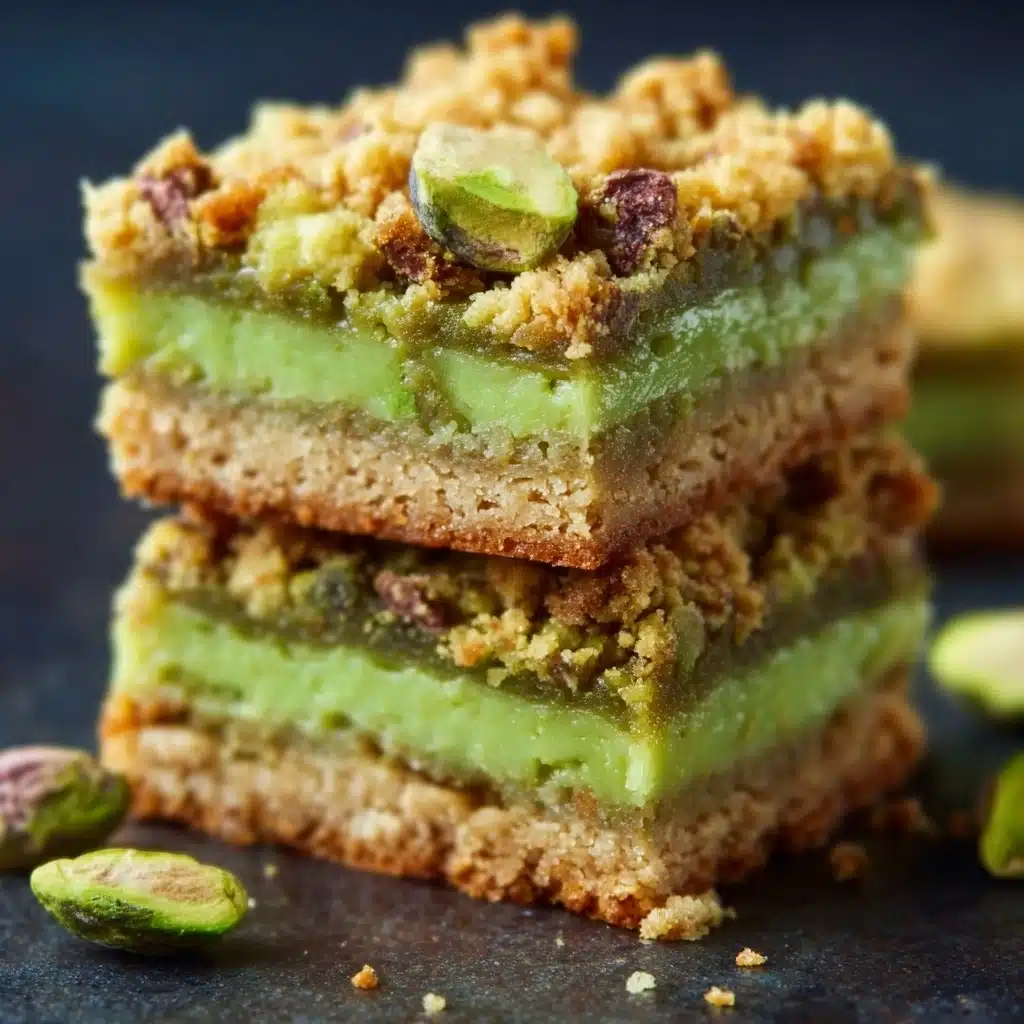
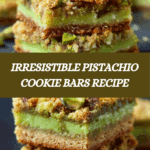
Pistachio Dream Cookie Bars Recipe
Creamy, nutty, and full of comforting nostalgia, Pistachio Dream Cookie Bars are your shortcut to dessert bliss. Imagine the chewy base of classic sugar cookies paired with the enchanting flavor and playful green color of pistachio pudding—all in one unbelievably easy recipe. These bars are perfect for any gathering, from casual picnics to holiday potlucks, and they’re sure to be swooned over by kids and grown-ups alike. Rich, tender, and with a flavor that tastes like springtime, these bars truly live up to their dreamy name.

Ingredients You’ll Need
It doesn’t get much easier or more scrumptious than this—the beauty is in the simplicity! Each ingredient for Pistachio Dream Cookie Bars brings its own magic, from the silky richness of butter to that signature pistachio color and taste.
- Unsalted butter, softened: Adds richness and keeps the bars moist, so don’t shortcut the softening step.
- Large eggs: Bind everything together and give the bars their perfect, tender bite.
- Pistachio instant pudding mix (3.4 oz): Creates the gorgeous green hue and irresistible nutty flavor—don’t use cook-and-serve pudding!
- Sugar cookie mix (1 package): The base that saves time while delivering classic cookie chewiness and sweetness.
How to Make Pistachio Dream Cookie Bars
Step 1: Preheat the Oven and Prepare Your Pan
Start by preheating your oven to 375°F. Give your 10 x 15-inch baking sheet a good greasing—this will help those bars release like a dream once baked. A little swipe of butter or nonstick spray on the pan’s bottom and sides will do the trick.
Step 2: Mix Butter, Eggs, and Pistachio Pudding
Grab a big mixing bowl and cream together the softened butter, eggs, and pistachio instant pudding mix. This mixture should come together into something smooth and creamy—almost like a pistachio custard. It already smells heavenly, right?
Step 3: Combine with Sugar Cookie Mix
Now, pour in the sugar cookie mix gradually, stirring with a spatula or wooden spoon. You’re aiming for a sticky, pale green dough that’s thick and irresistible. Make sure everything is integrated, but don’t overmix—just until there are no dry streaks left.
Step 4: Spread the Dough Evenly
Dump that glorious dough onto your prepared baking sheet and press it gently to fill the pan, spreading it all the way to the edges for even baking. Slightly damp hands or a spatula make this job much easier, and you want the top as smooth as possible.
Step 5: Bake to Perfection
Slide your pan into the oven and bake for 18 to 22 minutes. The edges should turn lightly golden, but the center will stay a shade lighter. Watch for doneness rather than overbaking—they’ll firm up as they cool.
Step 6: Cool and Slice
Once baked, let your Pistachio Dream Cookie Bars cool completely right in the pan. This helps set their chewy texture. Once cooled, use a sharp knife to slice into tidy bars or squares. Prepare for everyone to hover nearby, eager for a bite!
How to Serve Pistachio Dream Cookie Bars
Garnishes
Take your bars from delightful to dazzling with toppings like chopped roasted pistachios, a dusting of powdered sugar, or even a drizzle of white chocolate. These little touches add both texture and a pop of elegance, making each bite feel special.
Side Dishes
Pistachio Dream Cookie Bars pair beautifully with a scoop of vanilla ice cream, fresh berries, or a dollop of whipped cream. For a fancier spread, serve with a fruit platter or alongside a cup of your favorite coffee or tea—perfection!
Creative Ways to Present
If you’re serving a crowd, cut the bars into smaller bite-size pieces and arrange on a cake stand or platter for easy sharing. For holidays, shape them using cookie cutters or stack them in a “bar tower” with layers of parchment between. Watch smiles appear instantly!
Make Ahead and Storage
Storing Leftovers
These bars store wonderfully at room temperature for up to three days. Just keep them in an airtight container—there’s no risk of them drying out, though they might mysteriously vanish quickly!
Freezing
If you want to get ahead, Pistachio Dream Cookie Bars freeze beautifully. Layer the cooled, cut bars with parchment or wax paper and seal in a freezer-safe container. They’ll keep their dreamy texture and flavor for up to two months—just thaw at room temp before serving.
Reheating
While these bars are delicious chilled or at room temperature, you can quickly zap an individual square in the microwave for 5 to 10 seconds if you crave that just-baked warmth. They’ll turn even gooier and more aromatic, guaranteed to revive any sleepy afternoon.
FAQs
Can I use homemade sugar cookie dough instead of a mix?
Absolutely! If you have a go-to sugar cookie dough, feel free to swap it in for the mix. Just use enough dough for a standard 10 x 15-inch pan, and proceed as directed—the combination with the pistachio pudding will still be amazing.
Is it possible to make Pistachio Dream Cookie Bars gluten-free?
Yes! Simply use a high-quality gluten-free sugar cookie mix in place of the regular one. Double-check that your pudding mix is also gluten-free, and you’ll have a tasty treat everyone can enjoy.
Can I add mix-ins like chocolate chips or dried fruit?
Definitely! Stir in a half-cup of mini white chocolate chips, chopped pistachios, or even dried cranberries to add texture and fun flavor pops to your Pistachio Dream Cookie Bars.
What if I can’t find pistachio instant pudding?
If pistachio pudding mix is elusive, try searching online or at larger supermarkets. In a pinch, you could use vanilla pudding with a touch of almond extract and a small handful of finely chopped pistachios, though the color and flavor will differ slightly.
How long do Pistachio Dream Cookie Bars stay fresh?
Enjoy them within three days for the best texture, but when stored correctly, they’ll still taste pretty dreamy after that. Freezing extends their life up to two months!
Final Thoughts
Baking Pistachio Dream Cookie Bars is like gifting yourself and your friends a little slice of sweet, nutty happiness. Their color, flavor, and chewy-soft texture win hearts every single time, and they’re effortless enough for any baking level. Try them soon—your dessert table deserves a treat this magical!
PrintPistachio Dream Cookie Bars Recipe
Indulge in these delightful Pistachio Dream Cookie Bars that are a perfect blend of pistachio flavor and cookie goodness. Easy to make and even easier to enjoy, these bars are a treat for any occasion.
- Prep Time: 15 minutes
- Cook Time: 20 minutes
- Total Time: 35 minutes
- Yield: 12 bars 1x
- Category: Dessert
- Method: Baking
- Cuisine: American
- Diet: Vegetarian
Ingredients
For the Cookie Bars:
- ½ cup unsalted butter, softened
- 2 large eggs
- 3.4 oz pistachio instant pudding mix
- 1 package sugar cookie mix
Instructions
- Preheat Oven: Preheat your oven to 375°F.
- Mix Ingredients: In a large mixing bowl, cream together the softened butter, eggs, and pistachio pudding mix until smooth and creamy.
- Add Cookie Mix: Gradually add the sugar cookie mix, stirring until a sticky dough forms.
- Prepare Baking Sheet: Grease a 10 x 15-inch baking sheet and press the dough evenly into the pan, spreading it to the edges.
- Bake: Bake in the preheated oven for 18-22 minutes, or until the edges are lightly golden.
- Cool and Slice: Allow the pan to cool completely before slicing the dough into bars.
- Serve: Once cooled, cut into squares and serve.
Nutrition
- Serving Size: 1 bar
- Calories: 220
- Sugar: 12g
- Sodium: 180mg
- Fat: 10g
- Saturated Fat: 5g
- Unsaturated Fat: 4g
- Trans Fat: 0g
- Carbohydrates: 28g
- Fiber: 1g
- Protein: 3g
- Cholesterol: 45mg
Keywords: Pistachio Dream Cookie Bars, Pistachio Cookie Bars, Pistachio Pudding Bars