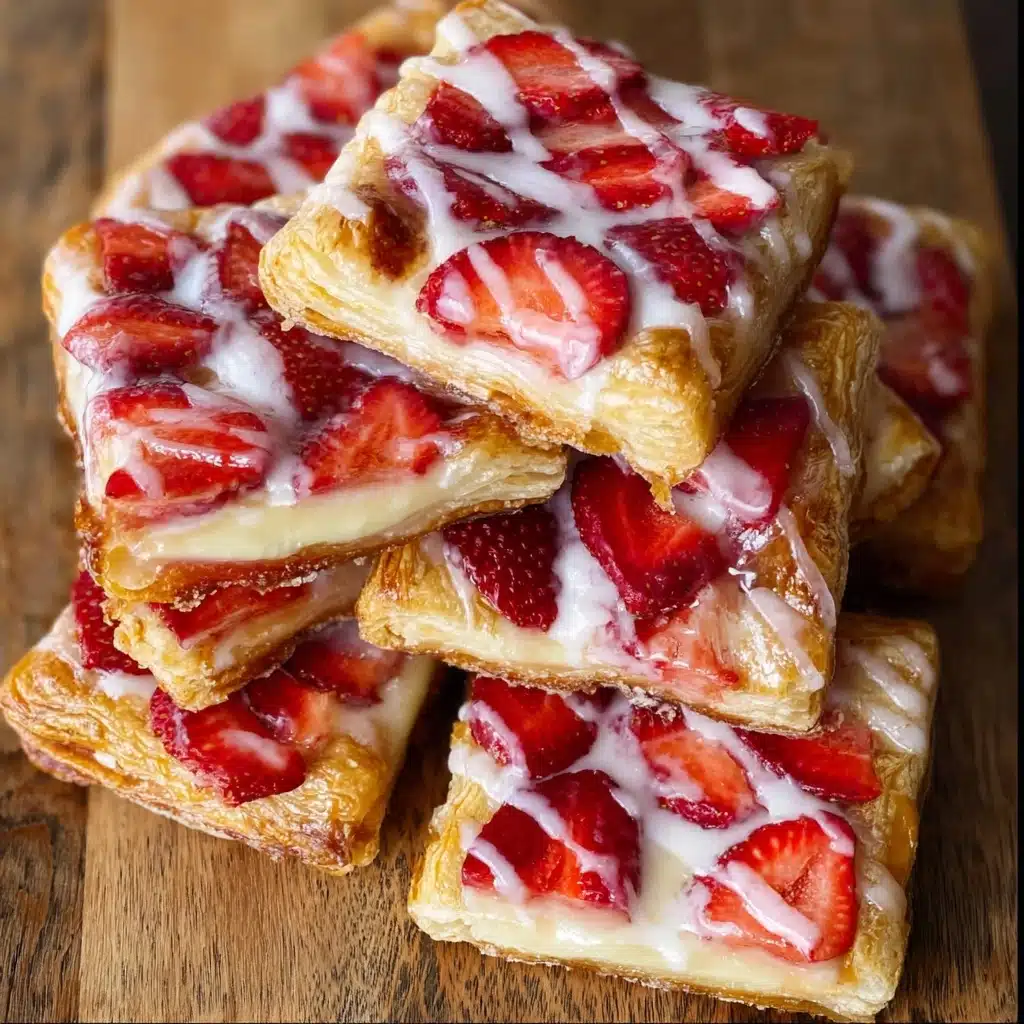
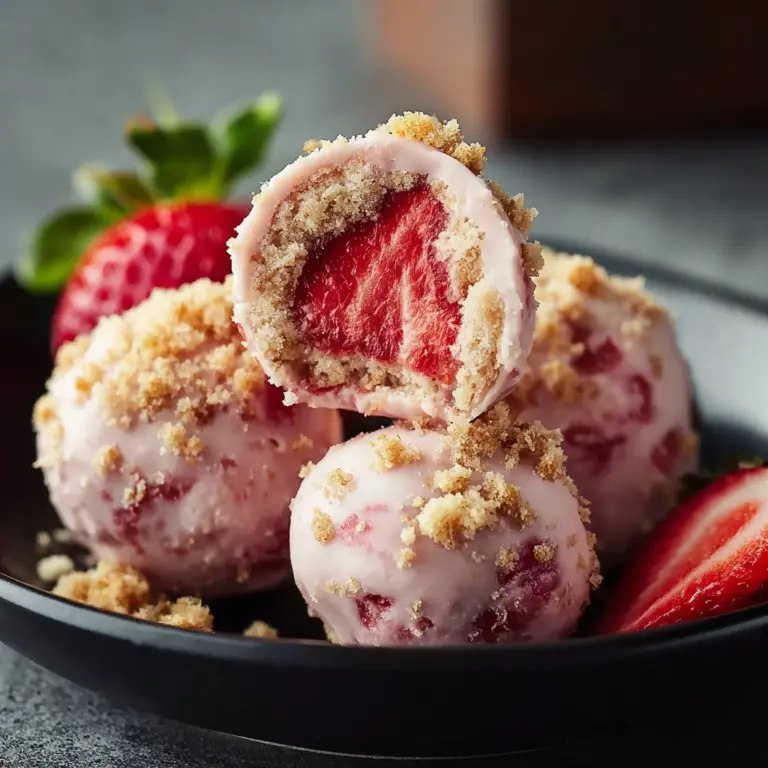
Strawberry Danish Recipe
There’s something absolutely magical about biting into a homemade Strawberry Danish: a flaky, buttery pastry bursting with vibrant berries, rich cream cheese, and a drizzle of sweet glaze. Whether you’re serving them for a leisurely weekend brunch or as a special treat with coffee, Strawberry Danish always steals the show. This recipe transforms everyday ingredients into a bakery-quality delight, and once you taste how fresh and luscious homemade can be, you may never settle for store-bought again!
Ingredients You’ll Need
The beauty of this Strawberry Danish is in its simplicity—just a handful of carefully chosen ingredients delivers layers of flavor, color, and texture. Here’s why each component matters and how it helps create Danish perfection:
- Strawberries: Use sweet, ripe strawberries for juicy, color-packed bites in every mouthful.
- Cornstarch: This thickens the berry juices slightly, ensuring your filling stays nestled rather than running all over your pastry.
- Sugar (for strawberries): A little sugar brings out the natural sweetness and juices of the berries.
- Cream Cheese: The base of that rich, tangy filling that melts into the pastry as it bakes.
- Powdered Sugar (for cream cheese and glaze): Dissolves seamlessly into the filling and glaze for that signature delicate sweetness.
- Vanilla Extract: Just a splash lifts the flavor of both the filling and the finishing glaze.
- Puff Pastry Sheets: The ultimate shortcut to buttery, crisp Danish layers without the fuss.
- Egg (for egg wash): Brushed on the pastry, it helps everything bake up gorgeously golden.
- Sugar (for topping, optional): Sprinkled on the edges, it adds a delightful crunch.
- Strawberry Jam (optional): A swipe of jam brings extra gloss and berry flavor to the top.
- Milk (for glaze): Gives your glaze the perfect drizzling texture.
How to Make Strawberry Danish
Step 1: Prepare the Strawberries
Begin by cleaning and slicing your strawberries. In a medium mixing bowl, toss the berries with cornstarch and sugar, coating them thoroughly. This quick maceration lets the berries soften slightly and releases their natural juices, marrying perfectly with the pastry later on. Let the strawberries rest for about 15 minutes at room temperature while you prep the other components.
Step 2: Make the Cream Cheese Filling
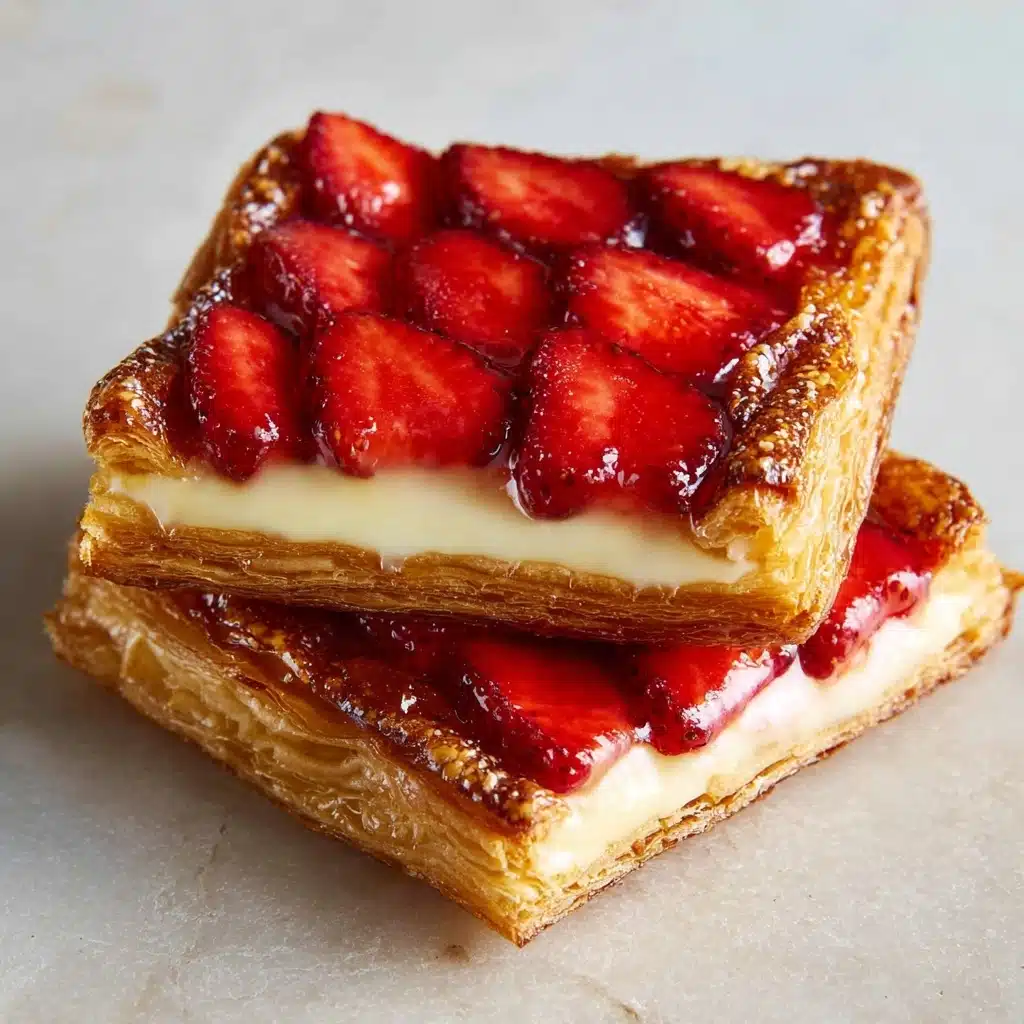
With a hand mixer or a sturdy spatula, whip the softened cream cheese until smooth as silk. Blend in the powdered sugar and vanilla extract, mixing until completely combined and creamy. Take a quick taste—it should be luscious and slightly tangy, with a hint of vanilla. Adjust the sweetness or vanilla as preferred.
Step 3: Prepare and Score the Puff Pastry
Unfold your thawed puff pastry sheets on a lightly floured surface. Gently separate along the folds and cut each large rectangle in half, so you have six smaller rectangles per sheet. Lay these on parchment-lined baking sheets. With a small paring knife, lightly score a border about 1/4 inch from the edge of each rectangle—don’t cut all the way through! This border will help the edges to rise beautifully in the oven and corral your luscious fillings in place.
Step 4: Assemble the Pastries
Spoon a generous tablespoon of the cream cheese filling onto the center of each pastry rectangle, keeping it inside the scored borders. Next, artfully layer the prepared strawberries over the cream cheese, covering the filling but not the edges. Brush the borders with a light coating of egg wash and, if you fancy a little extra sparkle, sprinkle the edges with sugar. If your puff pastry feels a bit warm or sticky, pop the assembled pastries into the fridge for 15-20 minutes—this simple step ensures maximum flakiness as they bake.
Step 5: Bake to Golden Perfection
Slide your trays into a preheated 400 F (204 C) oven and bake for 20-25 minutes, or until the pastry is puffed and golden brown and the strawberries are bubbling with juice. Your kitchen will smell irresistible! After baking, let the Strawberry Danish pastries cool on the pan for 5 minutes, then transfer to a wire rack to finish cooling.
Step 6: Add the Final Touches
For an exquisite finish, brush each Danish with a touch of warm strawberry jam—this not only adds a gleaming look but intensifies that beautiful berry flavor. If you love a glaze, whisk together powdered sugar, vanilla, and just enough milk to make a smooth, pourable icing, then drizzle it over the pastries once cool. Now you’re ready to devour or serve!
How to Serve Strawberry Danish
Garnishes
A Strawberry Danish looks and tastes even more special with thoughtful garnishes. A simple dusting of powdered sugar adds elegance, while a generous drizzle of vanilla glaze brings both gloss and creamy sweetness. For a truly bakery-worthy look, top with a few fresh strawberry slices or some finely shredded lemon zest.
Side Dishes
Pair your Strawberry Danish with freshly brewed coffee or tea for the ultimate breakfast or brunch treat. If you’re feeling festive, a bowl of softly whipped cream or a side of tangy Greek yogurt offers a delightful contrast to the sweet, fruity filling. These danishes also shine alongside other brunch classics like scrambled eggs or a crisp green salad for balanced, hearty fare.
Creative Ways to Present
Strawberry Danish is perfect for more than just breakfast! Try slicing into smaller, bite-sized squares for party trays, pairing with chocolate-dipped strawberries for Valentine’s Day, or stacking on tiered stands for an eye-catching dessert spread. Individual danishes nestled into cupcake wrappers also make adorable (and mess-free) treats for picnics or potlucks.
Make Ahead and Storage
Storing Leftovers
If you have leftover Strawberry Danish (lucky you!), store them in an airtight container at room temperature for up to one day, or in the refrigerator for up to three days. The pastry will soften slightly over time, but a quick reheat revives the crispness and flavor.
Freezing
To freeze, let the Danish cool completely, then wrap each one tightly in plastic wrap and transfer to a freezer-safe bag or container. They’ll keep beautifully for up to two months. For best results, freeze without the glaze or jam, and add them after reheating.
Reheating
To rejuvenate leftover or frozen Strawberry Danish, warm in a preheated 350 F (175 C) oven for 5-10 minutes, or until heated through and the pastry is crispy again. If you skipped the topping before freezing, add your glaze or jam after reheating for that just-baked finish.
FAQs
Can I use frozen strawberries for Strawberry Danish?
Absolutely! If using frozen berries, thaw and drain them well before mixing with sugar and cornstarch. This prevents excess moisture from making your filling runny.
Can I make these ahead of time?
Yes, you can assemble the danish up to step 4, then refrigerate the trays overnight. In the morning, simply bake as instructed and top with glaze or jam just before serving.
What if I don’t have puff pastry?
Puff pastry is essential for the classic Strawberry Danish texture, but in a pinch, crescent roll dough or phyllo dough can create a fun twist. The result will be a bit different, but still delicious.
Can I add other fruits?
Definitely! Try adding blueberries, raspberries, or even thinly sliced peaches along with the strawberries for a colorful, mixed-fruit Danish experience.
Do I have to use the glaze on top?
No glaze? No problem! While the glaze adds a classic sweetness, the Strawberry Danish is also fantastic with just a swipe of warm jam, a dusting of powdered sugar, or simply fresh from the oven.
Final Thoughts
If you’re searching for a bakery-style treat that wows every time, look no further than this Strawberry Danish. It’s the kind of recipe that draws smiles before the first bite, and I promise, the easy steps will reward you with flaky, fruit-filled perfection. Share with friends, serve to family, or savor with your favorite coffee—make this Strawberry Danish your new tradition!
PrintStrawberry Danish Recipe

Delicious and easy-to-make Strawberry Danish recipe that combines flaky puff pastry, creamy cheese filling, fresh strawberries, and a sweet glaze for the perfect breakfast or dessert treat.
- Prep Time: 45 minutes
- Cook Time: 25 minutes
- Total Time: 1 hour 10 minutes
- Yield: 6 servings 1x
- Category: Breakfast, Dessert
- Method: Baking
- Cuisine: European
- Diet: Vegetarian
Ingredients
Strawberries
- 4 cups sliced strawberries
- 1 tablespoon cornstarch
- 1 tablespoon sugar
Cream Cheese Filling
- 8 oz. (226 g) cream cheese, room temperature
- ½ cup (60 g) powdered sugar
- 1 teaspoon vanilla extract
Danish Pastry
- 2 puff pastry sheets, thawed
- 1 large egg lightly beaten with 1 teaspoon water
- 2 – 3 tablespoons sugar for topping, optional
Toppings
- ¼ cup (60 ml) strawberry jam, optional for topping
- 1 cup (120 g) powdered sugar
- ½ teaspoon vanilla extract
- 2 – 3 tablespoons (30 – 45 ml) milk
Instructions
- Prepare Strawberries: Clean and slice strawberries. Toss with sugar and cornstarch, let sit for 15 minutes.
- Make Cream Cheese Filling: Mix cream cheese, powdered sugar, and vanilla until smooth.
- Prepare Pastry: Thaw puff pastry, cut into rectangles, score borders, and spread cream cheese filling.
- Add Strawberries: Layer strawberries on top, brush edges with egg, sprinkle with sugar.
- Chill and Bake: Chill in the fridge, then bake at 400°F (204°C) for 20-25 minutes.
- Finish: Top with warm strawberry jam and powdered sugar, or vanilla glaze.
Notes
- Chilling the pastries before baking helps them puff up beautifully.
- You can customize the toppings with your favorite jams or glazes.
Nutrition
- Serving Size: 1 danish
- Calories: 320
- Sugar: 14g
- Sodium: 220mg
- Fat: 18g
- Saturated Fat: 8g
- Unsaturated Fat: 8g
- Trans Fat: 0g
- Carbohydrates: 34g
- Fiber: 2g
- Protein: 5g
- Cholesterol: 45mg
Keywords: Strawberry Danish, Pastry, Cream Cheese, Breakfast, Dessert, Easy Recipe
